If you are anything like me, you love an organized home but really dislike cleaning and getting it to that organized status. My cute sister is the total opposite. She loves organizing, and her house always looks incredible. She could clean all day long and be completely content and happy. Ugh! Emptying the dishwasher is painful for me! How are we possibly related?
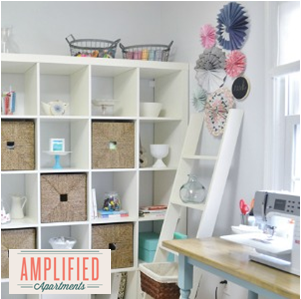
In an effort to do a little better and get more organized, I decided to go through my kitchen and organize all my baking products. I love, love, love baking and do a lot of it for my blog. My cabinets are filled with sprinkles, frostings, tips, bags and extracts, but because of their variety in size and shape, they can be awkward to organize. I often find myself throwing ingredients and tools into my cabinets until next time.
I decided that with a few adorable containers, I could turn things around and beautify my cabinets a bit. I purchased a crate for my extracts, a crate for my tips, a crate for my sprinkles, etc., and they look fantastic! My cabinets look so clean, and they are so organized! And because I couldn’t stand having just any old crates in my kitchen, I decided to spruce them up a bit. In a matter of minutes, with the use of some paint and a sponge brush, I transformed those containers into something very cool. I ended up with not only organized cabinets but really cute organized cabinets!


So what about you? Are you like my sister and hyper-clean? Or are you more like me, not super clean but really want to be? Either way, here is the tutorial to create DIY painted storage crates for your kitchen.

 Materials
- Wooden, glass or plastic containers (I found these wooden crates at Michaels in the dollar section)
- Acrylic paint
- Sponge brushes
- Washi tape
Instructions
- Grab your container and use the washi tape to tape off the section you would like painted. I chose a geometric shape and taped the container off at an angle. Ensure the tape is pressed tightly down on your container so the paint doesn’t seep through.
- Place a quarter-sized drop of acrylic paint on a paper plate or napkin, dip your brush into the paint and paint the container. I recommend starting with a light layer and then painting again to your liking.
- Once the paint is dry, remove the washi tape and fill your container with your kitchen goodies.