 This wreath is extremely simple, easy, and inexpensive to make. It only takes maybe an hour or 2 max unless you let your dogs play with your yarn. It may have seemed like a fun idea, but it can take three weeks because you’re busy getting the knots out. This happened to my boss and it literally took her three weeks because everything was so tangled.
Supplies for making your wreath:
This wreath is extremely simple, easy, and inexpensive to make. It only takes maybe an hour or 2 max unless you let your dogs play with your yarn. It may have seemed like a fun idea, but it can take three weeks because you’re busy getting the knots out. This happened to my boss and it literally took her three weeks because everything was so tangled.
Supplies for making your wreath: -Straw wreath
-Yarn (1 or multiple colors)
-Felt
-Hot glue gun, and
-One pearl ended straight pin
-Straw wreath
-Yarn (1 or multiple colors)
-Felt
-Hot glue gun, and
-One pearl ended straight pin
 What you need to do to make the wreath:
Using the hot glue gun, glue one end of the yarn to the backside of the straw wreath. Once that has cooled and dried, start wrapping your yarn around the wreath. This doesn’t have to be perfect and gaps are allowed. If you don’t want gaps in it, you can always go back and wrap it the opposite way to fill them in . To end the yarn you can cut it, slide it behind another piece and knot it, or you can hot glue it.
 d sometimes they look better that way.
Once you have them cut out, cut your circles into spirals. (Note that the thicker your spiral is the taller your flower will be and the thinner the spiral is the shorter it will be.)
Now that they are cut, take one of the circles and start rolling the spiral starting from the outside end all the way to the middle. Make sure to keep the bottom flat. You will then glue the last piece of the spiral to the bottom (flat end) of the flower to keep it together.
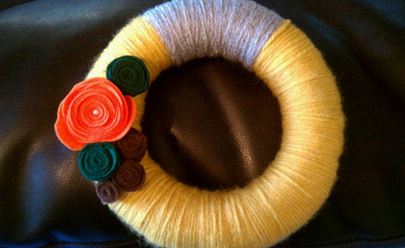
You can make as many of these in various sizes as you want. If you have a big flower, like the orange one in the picture, take the pearl ended straight pin and stick it in the middle to make it look less bulky. Arrange the flowers on the wreath any way you like.
If you feel like your wreath could use a little extra something, you can always make works out of the wood letter or whatever you can find at the craft store. In the picture the ghost box has letters in it that were initially going to be used to write “Fall,” but the wreath didn’t really need them.
d sometimes they look better that way.
Once you have them cut out, cut your circles into spirals. (Note that the thicker your spiral is the taller your flower will be and the thinner the spiral is the shorter it will be.)
Now that they are cut, take one of the circles and start rolling the spiral starting from the outside end all the way to the middle. Make sure to keep the bottom flat. You will then glue the last piece of the spiral to the bottom (flat end) of the flower to keep it together.
You can make as many of these in various sizes as you want. If you have a big flower, like the orange one in the picture, take the pearl ended straight pin and stick it in the middle to make it look less bulky. Arrange the flowers on the wreath any way you like.
If you feel like your wreath could use a little extra something, you can always make works out of the wood letter or whatever you can find at the craft store. In the picture the ghost box has letters in it that were initially going to be used to write “Fall,” but the wreath didn’t really need them.