Today we continue the week of celebrating the top five entries into the Coolest Space in Your Place photo contest! On this fine Tuesday, Stacy Risenmay shares with us how she turned her bedroom into a romantic and elegant retreat.
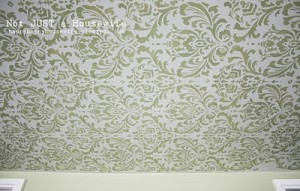
I have really enjoyed my bedroom since I stenciled the entire ceiling with a damask pattern. It was just the thing that was missing to finish off my room. I would love to share with you how I did it.



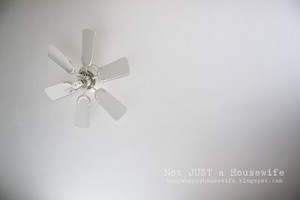
Here is the before. I know you all know what a white ceiling looks like, but I needed a before so that the after would be more dramatic 🙂 So here you go.
BEFORE
AFTER
 http://www.cuttingedgestencils.com
 is where I got the stencil. It is called Anna. They also sent me a foam roller. The stencil was really large which helps when you are painting a big area.
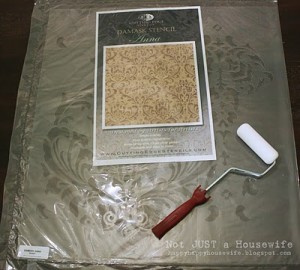
Because I was doing my ceiling and I had gravity working against me, I used a spray adhesive on the back of the stencil along with painters tape. Spray lightly and let it sit for a minute or two before sticking it to your ceiling. This will help so you don’t get any residue on your ceiling. If you do, use something like Goo Gone to remove it and it will be fine.
I started in the corner above my door so that if I messed up, no one would really notice when they looked in my room. The 2 things you need to remember are
a) don’t overload your roller with paint!
b) don’t push too hard. Both of these things will cause the paint to bleed under the stencil. If you are nervous, practice on cardboard or a garage wall. I found that I had to roll in all directions to get paint into the nooks and crannies. The first one I did 2 coats of paint. It was nice and even but I decided I like the look of one coat of paint better. It looked like fabric.
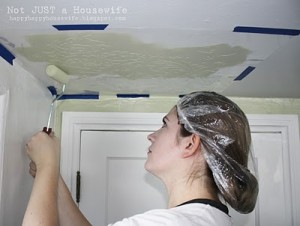
I know you are lovin’ the shower cap. I was totally channeling my inner lunch lady. I knew when I saved the free shower cap from my last hotel stay I could use it for something. Not a speck of paint in my hair!
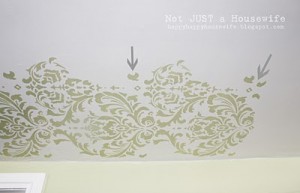
The stencils have these points ( shown by arrows). When you go to paint the next row, you line up the stencil to these points and it keeps everything straight. Pretty genius if you ask me.
Okay, now for the low down. Was this project easy? Yes. Was this project time consuming? Yes. I have four kids so that equals about 49 million interruptions. Because I was doing this on the ceiling I couldn’t just peel it off then move it in place and immediately start on the next one. I had to wait for the paint to dry on the stencil (5-10 minutes) before I could place it again. Why? Because I had to press on the stencil to get it to stick to the ceiling. Not fun when it is all wet. But it wasn’t too big of a deal. I would stick it up, paint it, take it down, and then go do something else for a bit. Change the laundry to the dryer, unload the dishwasher, play Go Fish with my 3 year old (you get the idea). Then I would run down and do another one. So in total, it took
four days.
IF I had been doing a wall like a normal person, it would have been MUCH faster.
IF I didn’t have any children at home to interrupt it would have been much, much faster.
Overall it was TOTALLY worth it! I have no idea how I lived with a white ceiling before.


 Here is the before. I know you all know what a white ceiling looks like, but I needed a before so that the after would be more dramatic 🙂 So here you go.
BEFORE
 AFTER
AFTER
 http://www.cuttingedgestencils.com is where I got the stencil. It is called Anna. They also sent me a foam roller. The stencil was really large which helps when you are painting a big area.
 Because I was doing my ceiling and I had gravity working against me, I used a spray adhesive on the back of the stencil along with painters tape. Spray lightly and let it sit for a minute or two before sticking it to your ceiling. This will help so you don’t get any residue on your ceiling. If you do, use something like Goo Gone to remove it and it will be fine.
I started in the corner above my door so that if I messed up, no one would really notice when they looked in my room. The 2 things you need to remember are a) don’t overload your roller with paint! b) don’t push too hard. Both of these things will cause the paint to bleed under the stencil. If you are nervous, practice on cardboard or a garage wall. I found that I had to roll in all directions to get paint into the nooks and crannies. The first one I did 2 coats of paint. It was nice and even but I decided I like the look of one coat of paint better. It looked like fabric.
 I know you are lovin’ the shower cap. I was totally channeling my inner lunch lady. I knew when I saved the free shower cap from my last hotel stay I could use it for something. Not a speck of paint in my hair!
The stencils have these points ( shown by arrows). When you go to paint the next row, you line up the stencil to these points and it keeps everything straight. Pretty genius if you ask me.
 Okay, now for the low down. Was this project easy? Yes. Was this project time consuming? Yes. I have four kids so that equals about 49 million interruptions. Because I was doing this on the ceiling I couldn’t just peel it off then move it in place and immediately start on the next one. I had to wait for the paint to dry on the stencil (5-10 minutes) before I could place it again. Why? Because I had to press on the stencil to get it to stick to the ceiling. Not fun when it is all wet. But it wasn’t too big of a deal. I would stick it up, paint it, take it down, and then go do something else for a bit. Change the laundry to the dryer, unload the dishwasher, play Go Fish with my 3 year old (you get the idea). Then I would run down and do another one. So in total, it took four days.
IF I had been doing a wall like a normal person, it would have been MUCH faster. IF I didn’t have any children at home to interrupt it would have been much, much faster.
Overall it was TOTALLY worth it! I have no idea how I lived with a white ceiling before.
